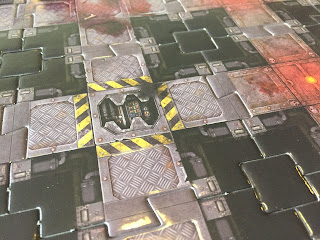
Space Hulk board build continues... casting and assembly of pieces now complete and about to move onto the painting stages.
It's a long time between posts on this... and probably ~18 months since first getting a copy of the Space Hulk box and starting to map out what this would look like.
As reminder... I originally wanted to do the 3D build using plaster tiles so that normal 40mm terminator bases could be used on them rather than only the terminators that come with the box. In hindsight... it would have been much quicker to paint the terminators *only* for space hulk vs building the boards from scratch. But anyway - it has been laborious but somewhat fun.
The cardboard tiles have been replicated mainly using Bruce Hirst's instructions from 3rd edition, and while going through construction I keep being reminded how well he mapped out use of all the parts from the mold efficiently across the entire build. The cardboard pieces are actually very well detailed & coloured... it's going to be interesting to see if the tiles can get some extra life with the painting & decoration stage.
I've been gluing the parts to black foamcore in batches - my storage tray has enough room for about 6x casts of the 4 main molds. After this I kind of need to dust any loose plaster off them and stick them down to do the next batch otherwise I can't close it.
Each foamcore board can take ~15-20 pieces (depending on which parts are being laid out), and I tend to line up and glue the floor tiles to completely dry before adding the edging.
I had a bit of extra fun with the additional parts - the 4th edition game includes the damaged control room and turbolift, which came after Brude did his plans. These have been made with the leftovers from various castings (plus some extra edges). The lift will be interesting to use - this has a very close/neat fit with the edge pieces but should look good.
The last section that took some time was assembling the doors. 2mm thick black card as the base (corners clipped to match the step pieces). The 2 step parts get glued on, while 2 reversed casting of the door are sanded flat and glued back to back. Sophisticated clamping system in play...
Finished unit looks a lot like this - while there is probably a little leeway in gluing the 4 parts together, sanding the backs and edges for a flush finish added some extra time.
And 20 doors done in total... that's 80 cast pieces (plus 20 card bases) for the set. The 5 on the right are the 'bulkhead' version from the extras mold (which has the grating & cracked tile parts). Pretty happy with how these turned out, and feel they need some extra warning labels or detail once painted.
Finally... the first ~1/3 of the parts got a quick base colour using latex house paint on the weekend. This is a tin of off-black (very dark charcoal/green); which has been difficult to get into all the tiniest crevices with a housebrush... but should take a black wash ok later on for touchups.
*Hopefully* the painting process will be somewhat quicker than assembly - the aim is to whip through with latex basecoat, then leadbelcher floor tiles and a heavy drybrush with a dark/mid green for the edges. Time permitting, the tubes on the edging will get a red & blue colour to match my genestealer bases.
In the meantime... still a bunch of parts to go in the basecoating stage...


No comments:
Post a Comment